You are currently browsing the crafts category
Displaying 61 - 70 of 82 entries.

day 3 eat sleep knit cal

  • Posted on March 10, 2016 at 12:46 pm

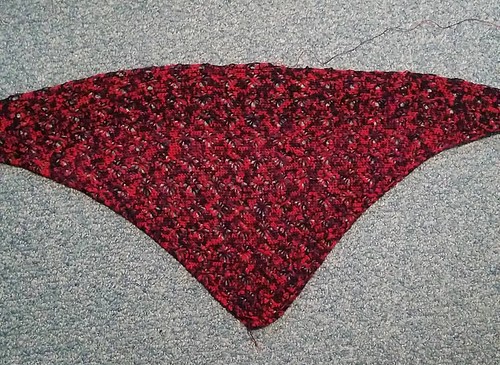
i finished the last 7 rows. though i was distracted and had to redo the last three rows.. twice! :argh! in my defence i had my kid home sick and i’m fighting the flu as well.

Finished!

apparently my scale is not as accurate as i would have liked. i had to frog my swatch to finish the last row and still ended up with only about 15 yds to spare. however i did win the came of chicken since i finished without running out:) i was hoping to put a border on the shawl but no yarn left and i don’t have anything in my stash that goes well enough. so it will stay as is. planning to dye it tomorrow if i have the right color in the basement dye stash.

apparently my scale is not as accurate as i would have liked. i had to frog my swatch to finish the last row and still ended up with only about 15 yds to spare. however i did win the came of chicken since i finished without running out:) i was hoping to put a border on the shawl but no yarn left and i don’t have anything in my stash that goes well enough. so it will stay as is.

now to see if i have the right blue dye in the basement dye stash to fix the color. i will post a picture of it again when i get it dyed and blocking or blocked.

day 2 eat sleep knit cal

  • Posted on March 9, 2016 at 10:13 pm

lots done today. i only have 7 more rows to do tomorrow. looks like i’m playing chicken with this one though. it’s taking about 1 gram per row and i only have 9 grams left. so it all depends on how accurate my scale is.

Moving right along

day 1 progress

  • Posted on March 8, 2016 at 10:14 pm

i got almost up to the 16 star pattern set done. not bad for the first day, i think if i keep this up i can get it done in a week like i was hoping. we’ll see how much i get done tomorrow….
Day 1 progress!

joining my first cal

  • Posted on March 8, 2016 at 3:08 pm

need a birthday gift for my niece so i’m joining a kal (cal) for a space shawl with some lovely soft yarn stashed ages ago from eat sleep knit. ( i get a lot of my doll yarn from there. the malabrigo lace is perfect for the tinies and sooo soft. this colorway just didn’t work out and i couldn’t bear to give it away so i’ts been sitting in my stash for years!)

Esk space shawl swatch
this is just the swatch to check my hook size. and i’ll use it to make sure i have the right blue tone, before i dye the whole shawl

the color way looks prettier/brighter than it really is, and it really doesn’t do the pattern justice, i’m more into tone on tone than variegated yarns lately. but the yarn is so nice i’m going to over dye it blue once i’m done to make a lovely purple and black tone on tone shawl.

i’m going to

fireplace final installment

  • Posted on December 23, 2015 at 5:19 pm

grate painted black looks like a well used cast iron grate.
Black grate
thread fire led lights through logs btw i ended up painted the lags with my ultra matte varnish because the ash kept getting all over my hands at this step Lol
Thread fire led lights through logs
put crumpled cellophane over the lights. this was included in the kit and just needed to be cut. i’d have preferred something more orange but couldn’t find any.
Cellophane over lights
punch holes for wires in back wall. i couldn’t find my awl so i used a large yarn needle and put in three small holes instead of one larger one. it really didn’t matter in the end.
Punch holes for wires in back wall
back view of wires threaded through
Back view
attach wires red to red, black to black
Attach wires red to red, black to black
tape everything down. the little white thing is an on off switch so the lights don’t go continuously.
Tape everything down
finished!
Finished!

i took a video of the fireplace with the lights flickering and it looks awesome. but apparently i can’t upload video to flickr, so i’ll have to figure out another place to upload it and then add it in.

working on the fire

  • Posted on December 22, 2015 at 4:52 pm

i want i light saber! we just saw star wars last night and they made cutting wood look so easy. this took far too long, i broke my pull saw and froze my fingers cutting these tiny things :(. then of course i forgot to take out a tape measure and had to guess on the size.. i like the look of the bigger logs better, but they ended up being too big. the smaller logs are just perfect. so i’ll be using them. i’ll save the bigger logs for another fireplace that i plan to do later.
Logs for the fireplace
i want my logs to look like they have really burnt so i am charring them in the flame of a candle. notice that i hold them with metal tongs and burn them in my kitchen sink just in case they decide to burn more than i planned! not likely since this wood is green and fairly wet from all the snow, but you never know…
Charing the logs for realism
here’s what one of the logs look like done.
A charred log
and the pile of finished logs. i wet them down thoroughly to make sure there were no sparks since the glue i’m using is flammable. so now i have to wait for them to dry before i can proceed.
Charred logs cooling and drying

my dh is building me a grate for my fireplace out of 2-1/2″ finishing nails. he still has to add the top rack. he designed it and did all the bending and cutting with his much stronger hands :o)
The start of a grate
and with the cross pieces added.
Grate!
just waiting for the glue to harden so i can paint it black

stockings!

  • Posted on December 19, 2015 at 4:41 pm

Stockings!
made some stockings for my kids. there are too many to hang fro the fireplace, so we are going with the older tradition of hanging them on the end of the bed on christmas eve. the biggest ones are for my msd sized dolls, the littler ones for my pukifee/latiyellow/tinydelfs etc. the real tiny dolls are still waiting for appropriate sized ones.

i made a bunch of extras to list on my etsy store next year for christmas… if i remember in time 😉

getting closer

  • Posted on December 18, 2015 at 5:19 pm

the front and mantel are now attached. but it is just resting on the hearth until i get the fire installed.
Getting closer
i’m really happy with how it is turning out, though i realized as i looked at it that i ended up making a fireplace that looks more well suited for a beach cottage, than the ancient english style manor that my crew is supposed to inhabit. lol oh well, i guess i’ll just have to make another one later on..

and a better view of the distressed finish of the wood on the mantel and the side. i really like how that turned out, especially considering the side is just the painted cardboard box!
Side view of wood
the mantel is a flat piece of wood with a square dowel glued to the front to form the overhang.

back to the fireplace

  • Posted on December 17, 2015 at 2:06 pm

i have been varnishing the fireplace and gluing the sides flat whenever i got a moment this week, not really something that showed up in pictures. now i finally got to apply the grout and find out if all those coats of varnish sealed my tiles/bricks well enough. in a couple of hours the grout will be dry enough to try and wash the haze off. if not i guess my tiles just got more subdued, which isn’t a bad look really… and i just added grouting to my list of new things i’ve tried!
Fireplace varnished and grouted
i like how much more finished the brick look now. i think if i was doing this again i would try to leave a bit more spacing between all the bricks to allow for the grouting. my bottom ones fit together a bit too closely.

edit: i went back to wipe off the haze and found i actually liked it better with some of the haze there. so ended up reapply a bit of the grout and wiping it off again to get the white back in the hollows. it has to dry overnight and then i’ll revarnish with my blend of matte and satin varnish to give a very subtle sheen.

while i’m waiting its time to start painting the hearth and mantel. for the hearth i wanted a stone look that coordinated with but didn’t match the stone in the fireplace, so i gathered up most of the same colors and added them to a paint palette made of a saran covered paper plate. i’ll be applying them with a cheap kitchen sponge to a piece of white painted mdf board.
Paint palette for the hearth.

and.. the painted hearth and mantel.
Painted hearth and mantle
i kept dipping the sponge in the paint and applying till i got the look i wanted. i’ve done marbling on full sized walls before so this time i had an idea of what i wanted to do :)) when it dries i’ll paint it with a blend of matte and satin varnish to get a really subtle sheen since the satin is too shiny and the matte too dull.

it’s hard to see on the mantel but i painted it with white chalk paint and then when it was dry sanded it smooth and it matches the wood front almost perfectly :yay! i’ll be coating that with my ulta matte varnish to keep the worn look.

bed for a 15cm princess- pillow

  • Posted on December 16, 2015 at 12:10 pm

now onto the pillow. a necessity for a comfy sleep. cut a rectangle of cotton and one of batting, make sure you add seam allowance on all the sides. fold in half and stitch together leaving a small opening to turn.
Pillow lined with batting
turn right side out and fill with “pellets”. i used glass sand blasting pellets just cause that’s what i have on hand. i bought a huge bag years ago, when i was still making bears and i still have tons left! but you can also use seed beads, play sand (clean please) or some miniature sites also say to use salt but you would have to be sure it would never get wet!
Turn and fill with "pellets"
because my pellets are so fine and i don’t want any leakage at the seam i put a fine line of fabric glue on the inner seam. it is flexible and doesn’t show especially under the batting. after gluing it together i close the seam with a ladder stitch as usual.
Glue inside edge to seal pellets in
now take a nap on your comfy new pillow.
Take a nap
liya approves and demonstrates just how soft and squishy her new pillow is.